Dents at a Cluster Weld
Dents at a cluster weld can be repaired by welding a formed steel patch plate over the dented area and surrounding tubes. Remove any existing finish on the damaged area and thoroughly clean prior to welding.To prepare the patch plate, cut a section from a steel sheet of the same material and thickness as the heaviest tube damaged.
Fashion the reinforcement plate so that the fingers extend over the tubes a minimum of 1½ times the respective tube diameter. The plate may be cut and formed prior to welding or cut and tack welded to the cluster, then heated and formed around the joint to produce a snug smooth contour. Apply sufficient heat to the plate while forming so there is a gap of no more than 1⁄16-inch from the contour of the joint to the plate.
 |
| Figure 1. Repair of tubing dented at a cluster |
In this operation, avoid unnecessary heating and exercise care to prevent damage at the point of the angle formed by any two adjacent fingers of the plate. After the plate is formed and tack welded to the joint, weld all the plate edges to the cluster joint. [Figure 1]
Select a length of steel tube of the same material and at least the same wall thickness having an inside diameter approximately equal to the outside diameter of the damaged tube.
Diagonally cut the selected piece at a 30° angle on both ends so the minimum distance of the sleeve from the edge of the crack or dent is not less than 1½ times the diameter of the damaged tube. Then, cut through the entire length of the sleeve and separate the half sections as shown in Figure 2. Clamp the two sleeve sections in the proper position on the damaged area of the tube. Weld the reinforcement sleeve along the length of the two sides, and weld both ends of the sleeve to the damaged tube.
Slip the two sleeves over the replacement tube, align the replacement tube with the original tube stubs, and slip the sleeves over the center of each joint. Adjust the sleeves to the area to provide maximum reinforcement.
Tack weld the two sleeves to the replacement tube in two places before welding ends. Apply a uniform weld around both ends of one of the reinforcement sleeves and allow the weld to cool. Then, weld around both ends of the remaining reinforcement tube. Allow one sleeve weld to cool before welding the remaining tube to prevent undue warping.
The landing gear assembly type D is generally nonrepairable for the following reasons:
The spring-steel leaf, shown as type E, is a component of a standard main landing gear on many light aircraft. The spring-steel part is, in general, nonrepairable, should not be welded on, and should be replaced when it is excessively sprung or otherwise damaged.
Streamline tubing, used for some light aircraft landing gear, may be repaired using a round insert tube of the same material and having a wall thickness of one gauge thicker than the original streamline tube and inserting and welding as shown in Figure 7.
Dents Between Clusters
A damaged tubular section can be repaired using welded split sleeve reinforcement. The damaged member should be carefully straightened and should be stop drilled at the ends of any cracks with a No. 40 drill bit.Select a length of steel tube of the same material and at least the same wall thickness having an inside diameter approximately equal to the outside diameter of the damaged tube.
Diagonally cut the selected piece at a 30° angle on both ends so the minimum distance of the sleeve from the edge of the crack or dent is not less than 1½ times the diameter of the damaged tube. Then, cut through the entire length of the sleeve and separate the half sections as shown in Figure 2. Clamp the two sleeve sections in the proper position on the damaged area of the tube. Weld the reinforcement sleeve along the length of the two sides, and weld both ends of the sleeve to the damaged tube.
 |
| Figure 2. Repair using welded sleeve |
Tube Splicing with Inside Sleeve Reinforcement
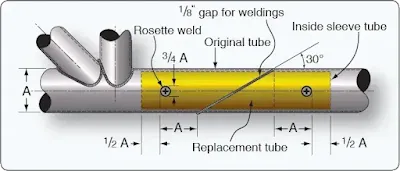
If a partial replacement of the tube is necessary, do an inner sleeve splice, especially where you want a smooth tube surface.
Make a diagonal cut to remove the damaged section of the tube, and remove the burrs from the inner and outer cut edges with a file or similar means. Diagonally cut a replacement steel tube of the same material, diameter, and wall thickness to match the length of the removed section of the damaged tube. The replacement tube should allow a 1⁄8-inch gap for welding at each end to the stubs of the original tube.
Make a diagonal cut to remove the damaged section of the tube, and remove the burrs from the inner and outer cut edges with a file or similar means. Diagonally cut a replacement steel tube of the same material, diameter, and wall thickness to match the length of the removed section of the damaged tube. The replacement tube should allow a 1⁄8-inch gap for welding at each end to the stubs of the original tube.
Select a length of steel tubing of the same material and at least the same wall thickness with an outside diameter equal to the inside diameter of the damaged tube. From this inner sleeve tube material, cut two sections of tubing, each of such a length that the ends of the inner sleeve is a minimum distance of 1½ times the tube diameter from the nearest end of the diagonal cut. Tack the outer and inner replacement tubes using rosette welds. Weld the inner sleeve to the tube stubs through the 1⁄8-inch gap forming a weld bead over the gap and joining with the new replacement section. [Figure 3]
 |
| Figure 3. Splicing with inner sleeve method |
Tube Splicing with Outer Split Sleeve Reinforcement
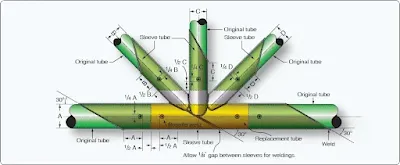
If partial replacement of a damaged tube is necessary, make the outer sleeve splice using a replacement tube of the same diameter and material. [Figures 4 and 5]
 |
| Figure 4. Splicing by the outer sleeve method |
 |
| Figure 5. Tube replacement at a cluster by outer sleeve method |
To perform the outer sleeve repair, remove the damaged section of the tube, utilizing a 90° cut at either end. Cut a replacement steel tube of the same material, diameter, and at least the same wall thickness to match the length of the removed portion of the damaged tube. The replacement tube must bear against the stubs of the original tube with a tolerance of ±1⁄64-inch. The material selected for the outer sleeve must be of the same material and at least the same wall thickness as the original tube. The clearance between the inside diameter of the sleeve and the outside diameter of the original tube may not exceed 1⁄16-inch. From this outer sleeve tube material, either cut diagonally or fishmouth two sections of tubing, each of such a length that the nearest end of the outer sleeve is a minimum distance of 1½ tube diameters from the end of the cut on the original tube. Use the fish mouth sleeve wherever possible. Remove all burrs from the edges of the replacement tube, sleeves, and the original tube stubs.
Slip the two sleeves over the replacement tube, align the replacement tube with the original tube stubs, and slip the sleeves over the center of each joint. Adjust the sleeves to the area to provide maximum reinforcement.
Tack weld the two sleeves to the replacement tube in two places before welding ends. Apply a uniform weld around both ends of one of the reinforcement sleeves and allow the weld to cool. Then, weld around both ends of the remaining reinforcement tube. Allow one sleeve weld to cool before welding the remaining tube to prevent undue warping.
Landing Gear Repairs
Some components of a landing gear may be repaired by welding while others, when damaged, may require replacement. Representative types of repairable and nonrepairable landing gear assemblies are shown in Figure 6. |
| Figure 6. Representative types of repairable and nonrepairable landing gear assemblies |
The landing gear types shown in A, B, and C of this figure are repairable axle assemblies. They are formed from steel tubing and may be repaired by any of the methods described in this article or in FAA Advisory Circular (AC) 43.13‑1, Acceptable Methods, Techniques, and Practices—Aircraft Inspection and Repair. However, it must be determined if the assemblies were heat treated. Assemblies originally heat treated must be reheat treated after a welding repair.
The landing gear assembly type D is generally nonrepairable for the following reasons:
- The lower axle stub is usually made from a highly heat-treated nickel alloy steel and machined to close tolerances. It should be replaced when damaged.
- During manufacture, the upper oleo section of the assembly is heat treated and machined to close tolerances to assure proper functioning of the shock absorber. These parts would be distorted by any welding repair and should be replaced if damaged to ensure the part was airworthy.
The spring-steel leaf, shown as type E, is a component of a standard main landing gear on many light aircraft. The spring-steel part is, in general, nonrepairable, should not be welded on, and should be replaced when it is excessively sprung or otherwise damaged.
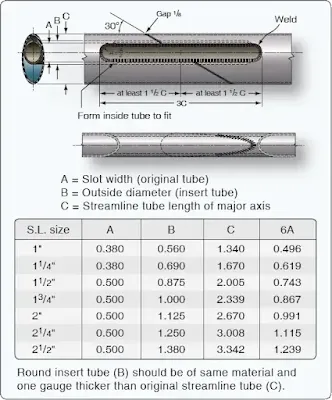
Streamline tubing, used for some light aircraft landing gear, may be repaired using a round insert tube of the same material and having a wall thickness of one gauge thicker than the original streamline tube and inserting and welding as shown in Figure 7.
 |
| Figure 7. Streamline landing gear repair using round tube |
The streamline landing gear tube may also be repaired by inserting a tube of the same streamline original tubing and welding. This can be accomplished by cutting off the trailing edge of the insert and fitting it into the original tube. Once fitted, remove the insert, weld the trailing edge back together, and reinsert into the original tube. Use the figures and weld as indicated in Figure 8.
 |
| Figure 8. Streamline tube splice using split insert |
Engine Mount Repairs
All welding on an engine mount should be performed by an experienced welder and be of the highest quality, since vibration tends to accentuate any minor defect.
The preferred method to repair an engine mount member is by using a larger diameter replacement tube telescoped over the stub of the original member using fish-mouth and rosette welds. 30° scarf welds are also acceptable in place of the fish-mouth welds.
One of the most important aspects to keep in mind when repairing an engine mount is that the alignment of the structure must be maintained. This can be accomplished by attaching to a fixture designed for that purpose, or bolting the mount to an engine and/or airframe before welding.
All cracked welds should be ground out and only high-grade filler rod of the appropriate material should be used.
If all members of the mount are out of alignment, the mount should be replaced with one supplied by the manufacturer or with one built to conform to the manufacturer’s drawings and specifications.
Minor damage, such as a crack adjacent to an engine attachment lug, can be repaired by rewelding the ring and extending a gusset or a mounting lug past the damaged area. Engine mount rings that are extensively damaged must not be repaired unless the method of repair is specifically approved by FAA Engineering, a Designated Engineering Representative (DAR), or the repair is accomplished in accordance with FAA-approved instructions.
If the manufacturer stress relieved the engine mount after welding, the engine mount should again be stress relieved after weld repairs are made.
RELATED POSTS
If all members of the mount are out of alignment, the mount should be replaced with one supplied by the manufacturer or with one built to conform to the manufacturer’s drawings and specifications.
Minor damage, such as a crack adjacent to an engine attachment lug, can be repaired by rewelding the ring and extending a gusset or a mounting lug past the damaged area. Engine mount rings that are extensively damaged must not be repaired unless the method of repair is specifically approved by FAA Engineering, a Designated Engineering Representative (DAR), or the repair is accomplished in accordance with FAA-approved instructions.
If the manufacturer stress relieved the engine mount after welding, the engine mount should again be stress relieved after weld repairs are made.
Rosette Welding
Rosette welds are used on many of the type repairs that were previously discussed. They are holes, typically one-fourth the diameter of the original tube, drilled in the outer splice and welded around the circumference for attachment to the inner replacement tube or original tube structure.RELATED POSTS
