 |
| Figure 2. Tap testing techniques |
Step 2: Remove Water From Damaged Area
Water needs to be removed from the core before the part is repaired. [Figure 3] If the water is not removed, it boils during the elevated temperature cure cycle and the face sheets blow off the core, resulting in more damage. Water in the honeycomb core could also freeze at the low temperatures that exist at high altitudes, which could result in disbonding of the face sheets.
 |
| Figure 3. Vacuum bag method for drying parts |
Step 3: Remove the Damage
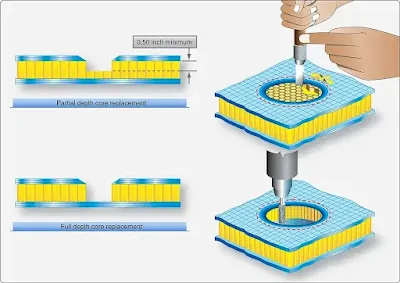
Trim out the damage to the face sheet to a smooth shape with rounded corners, or a circular or oval shape. Do not damage the undamaged plies, core, or surrounding material. If the core is damaged as well, remove the core by trimming to the same outline as the skin. [Figure 4]
 |
| Figure 4. Core damage removal |
Step 4: Prepare the Damaged Area
Use a flexible disk sander or a rotating pad sander to taper sand a uniform taper around the cleaned up damage. Some manufacturers give a taper ratio, such as 1:40, and others prescribe a taper distance like a 1-inch overlap for each existing ply of the face sheet. Remove the exterior finish, including conductive coating for an area that is at least 1 inch larger than the border of the taper. Remove all sanding dust with dry compressed air and a vacuum cleaner. Use a clean cloth moistened with approved solvent to clean the damaged area. [Figure 5]
 |
| Figure 5. Taper sanding of repair area |
Step 5: Installation of Honeycomb Core (Wet Layup)
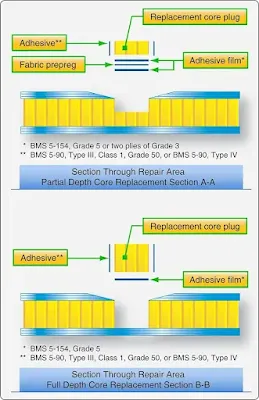
Use a knife to cut the replacement core. The core plug must be of the same type, class, and grade of the original core. The direction of the core cells should line up with the honey comb of the surrounding material. The plug must be trimmed to the right length and be solvent washed with an approved cleaner.
For a wet layup repair, cut two plies of woven fabric that fit on the inside surface of the undamaged skin. Impregnate the fabric plies with a resin and place in the hole. Use potting compound around the core and place it in the hole. For a prepreg repair, cut a piece of film adhesive that fits the hole and use a foaming adhesive around the plug. The plug should touch the sides of the hole. Line up the cells of the plug with the original material. Vacuum bag the repair area and use an oven, autoclave, or heat blanket to cure the core replacement. The wet layup repair can be cured at a room temperature up to 150 °F. The prepreg repair must be cured at 250 °F or 350 °F. Usually, the core replacement is cured with a separate curing cycle and not co-cured with the patch. The plug must be sanded flush with the surrounding area after the cure. [Figure 6]
 |
| Figure 6. Core replacement |
Step 6: Prepare and Install the Repair Plies
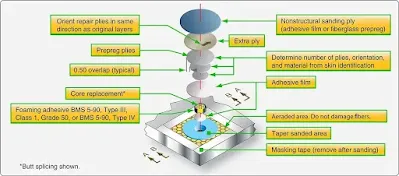
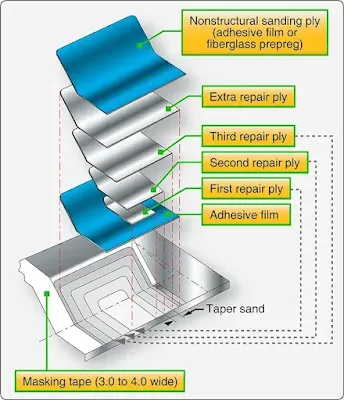
Consult the repair manual for the correct repair material and the number of plies required for the repair. Typically, one more ply than the original number of plies is installed. Cut the plies to the correct size and ply orientation. The repair plies must be installed with the same orientation as that of the original plies being repaired. Impregnate the plies with resin for the wet layup repair, or remove the backing material from the prepreg material. The plies are usually placed using the smallest ply first taper layup sequence. [Figure 7]
 |
| Figure 7. Repair ply installation |
Step 7: Vacuum Bag the Repair
Once the ply materials are in place, vacuum bagging is used to remove air and to pressurize the repair for curing. Refer to Figure 8 for bagging instructions.
 |
| Figure 8. Vacuum processing |
Step 8: Curing the Repair
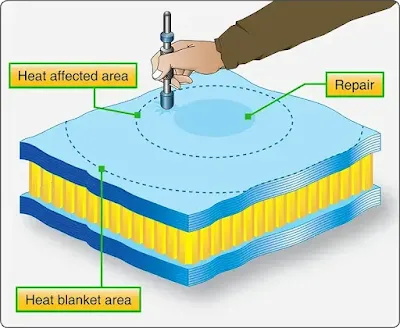
The repair is cured at the required cure cycle. Wet layup repairs can be cured at room temperature. An elevated temperature up to 150 °F can be used to speed up the cure. The prepreg repair needs to be cured at an elevated cure cycle. [Figure 9] Parts that can be removed from the aircraft could be cured in a hot room, oven, or autoclave. A heating blanket is used for on-aircraft repairs.
 |
| Figure 9. Curing the repair |
Remove the bagging materials after curing and inspect the repair. The repair should be free from pits, blisters, resin-rich and resin-starved areas. Lightly sand the repair patch to produce a smooth finish without damaging the fibers. Apply top finish and conductive coating (lighting protection).
Step 9: Post Repair Inspection
Use visual, tap, and/or ultrasonic inspection to inspect the repair. Remove the repair patch if defects are found. [Figure 10] Perform a balance check if a repair to a flight control surface was made, and ensure that the repaired flight control is within limits of the SRM. Failure to do so could result in flight control flutter, and safety of flight could be affected. |
| Figure 10. Post-repair inspection |
Solid Laminates
Bonded Flush Patch Repairs
New generation aircraft have fuselage and wing structures made from solid laminates that are externally stiffened with co-cured or co-bonded stringers. These solid laminates have many more plies than the face sheets of honeycomb sandwich structures. The flush repair techniques for solid laminate structures are similar for fiberglass, Kevlar®, and graphite with minor differences.
A flush repair can be stepped or, more commonly, scarved (tapered). The scarf angles are usually small to ease the load into the joint and to prevent the adhesive from escaping. This translates into thickness-to-length ratios of 1:10 to 1:70.
Because inspection of bonded repairs is difficult, bonded repairs, as contrasted with bolted repairs, require a higher commitment to quality control, better trained personnel, and cleanliness.
The scarf joint is more efficient from the viewpoint of load transfer as it reduces load eccentricity by closely aligning the neutral axis of the parent and the patch. However, this configuration has many drawbacks in making the repair. First, to maintain a small taper angle, a large quantity of sound material must be removed. Second, the replacement plies must be very accurately laid up and placed in the repair joint. Third, curing of replacement plies can result in significantly reduced strength if not cured in the autoclave.
Fourth, the adhesive can run to the bottom of the joint, creating a nonuniform bond line. This can be alleviated by approximating the scarf with a series of small steps. For these reasons, unless the part is lightly loaded, this type of repair is usually performed at a repair facility where the part can be inserted into the autoclave, which can result in part strength as strong as the original part. There are several different repair methods for solid laminates. The patch can be precured and then secondarily bonded to the parent material. This procedure most closely approximates the bolted repair. [Figure 11] The patch can be made from prepreg and then co-cured at the same time as the adhesive. The patch can also be made using a wet layup repair. The curing cycle can also vary in length of time, cure temperature, and cure pressure, increasing the number of possible repair combinations. |
| Figure 11. A precured patch can be secondarily bound to the parent material |
Scarf repairs of composite laminates are performed in the sequence of steps described below.
Step 1: Inspection and Mapping of Damage
The size and depth of damage to be repaired must be accurately surveyed using appropriate nondestructive evaluation (NDE) techniques. A variety of NDE techniques can be used to inspect for damage in composite structures. The simplest technique is visual inspection, in which whitening due to delamination and/or resin cracking can be used to indicate the damage area in semitransparent composites, such as glass-polyester and glass-vinyl ester laminates.
Visual inspection is not an accurate technique because not all damage is detectable to the eye, particularly damage hidden by paint, damage located deep below the surface, and damage in nontransparent composites, such as carbon and aramid laminates. A popular technique is tap testing, in which a lightweight object, such as a coin or hammer, is used to locate damage. The main benefits of tap testing are that it is simple and it can be used to rapidly inspect large areas. Tap testing can usually be used to detect delamination damage close to the surface, but becomes increasingly less reliable the deeper the delamination is located below the surface. Tap testing is not useful for detecting other types of damage, such as resin cracks and broken fibers.
More advanced NDE techniques for inspecting composites are impedance testing, x-ray radiography, thermography, and ultrasonics. Of these techniques, ultrasonics is arguably the most accurate and practical and is often used for surveying damage. Ultrasonics can be used to detect small delaminations located deep below the surface, unlike visual inspection and tap testing.
Step 2: Removal of Damaged Material
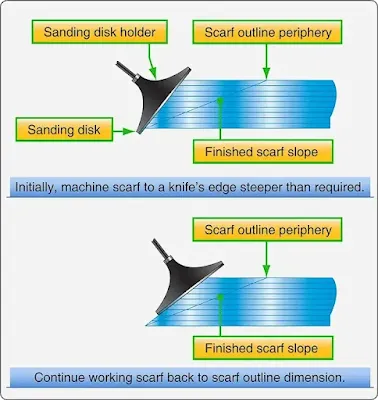
Once the scope of the damaged area to be repaired has been determined, the damaged laminate must be removed. The edges of the sound laminate are then tapered back to a shallow angle. The taper slope ratio, also known as the scarf angle, should be less than 12 to 1 (< 5°) to minimize the shear strains along the bond line after the repair patch is applied. The shallow angle also compensates for some errors in workmanship and other shop variables that might diminish patch adhesion. [Figure 12] |
| Figure 12. Scarf patch of solid laminate |
Step 3: Surface Preparation
The laminate close to the scarf zone should be lightly abraded with sandpaper, followed by the removal of dust and contaminates. It is recommended that, if the scarf zone has been exposed to the environment for any considerable period of time, it should be cleaned with a solvent to remove contamination.
Step 4: Molding
A rigid backing plate having the original profile of the composite structure is needed to ensure the repair has the same geometry as the surrounding structure.
Step 5: Laminating
Laminated repairs are usually done using the smallest ply-first taper sequence. While this repair is acceptable, it produces relatively weak, resin-rich areas at each ply edge at the repair interface. The largest ply first laminate sequence, where the first layer of reinforcing fabric completely covers the work area, produces a stronger interface joint. Follow the manufacturer’s SRM instructions.
Selection of the reinforcing material is critical to ensuring the repair has acceptable mechanical performance. The reinforcing fabric or tape should be identical to the reinforcement material used in the original composite. Also, the fiber orientation of the reinforcing layers within the repair laminate should match those of the original part laminate, so that the mechanical properties of the repair are as close to original as possible.
Step 6: Finishing
After the patch has cured, a conducting mesh and finish coat should be applied if needed.
Trailing Edge and Transition Area Patch Repairs
Trailing edges of control panels are highly vulnerable to damage. The aft 4 inches are especially subject to ground collision and handling, as well as to lightning strike. Repairs in this region can be difficult because both the skins and the trailing edge reinforcement may be involved. The repairs to a honeycomb core on a damaged edge or panel are similar to the repair of a sandwich honeycomb structure discussed in the Damage Requiring Core Replacement and Repair to One or Both Faceplate Repair sections. Investigate the damage, remove damaged plies and core, dry the part, install new core, layup the repair plies, curing and post inspection. A typical trail edge repair is shown in Figure 13. |
| Figure 13. Trailing edge repair |
Resin Injection Repairs
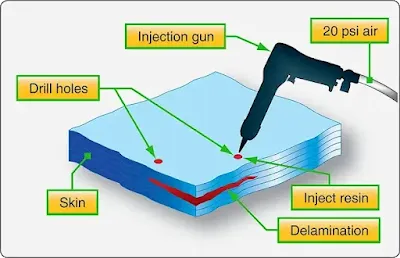
Resin injection repairs are used on lightly loaded structures for small damages to a solid laminate due to delamination. Two holes are drilled on the outside of the delamination area and a low-viscosity resin is injected in one hole until it flows out the other hole. Resin injection repairs are sometimes used on sandwich honeycomb structure to repair a facesheet disbond. Disadvantages of the resin injection method are that the fibers are cut as a result of drilling holes, it is difficult to remove moisture from the damaged area, and it is difficult to achieve complete infusion of resin. [Figure 14]
 |
| Figure 14. Resin injection repair |
Composite Patch Bonded to Aluminum Structure
Composite materials can be used to structurally repair, restore, or enhance aluminum, steel, and titanium components. Bonded composite doublers have the ability to slow or stop fatigue crack growth, replace lost structural area due to corrosion grindouts, and structurally enhance areas with small and negative margins.
Boron epoxy, GLARE®, and graphite epoxy materials have been used as composite patches to restore damaged metallic wing skins, fuselage sections, floor beams, and bulkheads. As a crack growth inhibitor, the stiff bonded composite materials constrain the cracked area, reduce the gross stress in the metal, and provide an alternate load path around the crack. As a structural enhancement or blendout filler, the high modulus fiber composites offer negligible aerodynamic resistance and tailorable properties.
Surface preparation is very important to achieve the adhesive strength. Grit blast silane and phosphoric acid anodizing are used to prepare aluminum skin. Film adhesives using a 250 °F (121 °C) cure are used routinely to bond the doublers to the metallic structure. Critical areas of the installation process include a good thermal cure control, having and maintaining water-free bond surfaces, and chemically and physically prepared bond surfaces.
Secondarily bonded precured doublers and in-situ cured doublers have been used on a variety of structural geometries ranging from fuselage frames to door cutouts to blade stiffeners. Vacuum bags are used to apply the bonding and curing pressure between the doubler and metallic surface.
Fiberglass Molded Mat Repairs
Fiberglass molded mats consists of short fibers, and the strength is much less than other composite products that use continuous fibers. Fiberglass molded mats are not used for structural repair applications, but could be used for non-structural applications. The fiberglass molded mat is typically used in combination with fiberglass fabric. The molded mats are impregnated with resin just like a wet layup for fiberglass fabric. The advantage of the molded mat is the lower cost and the ease of use.
Radome Repairs
Aircraft radomes, being an electronic window for the radar, are often made of nonconducting honeycomb sandwich structure with only three or four plies of fiberglass. The skins are so thin so that they do not block the radar signals. The thin structure, combined with the location in front of the aircraft, makes the radome vulnerable to hail damage, bird strikes, and lightning strikes. Low-impact damage could lead to disbonds and delamination. Often, water is found in the radome structure due to impact damage or erosion. The moisture collects in the core material and begins a freeze-thaw cycle each time the airplane is flown. This eventually breaks down the honeycomb material causing a soft spot on the radome itself. Damage to a radome needs to be repaired quickly to avoid further damage and radar signal obstructions. Trapped water or moisture can produce a shadow on the radar image and severely degrade the performance of the radar. To detect water ingression in radomes, the available NDE techniques include x-ray radiography, infrared thermography, and a radome moisture meter that measures the RF power loss caused by the presence of water. The repairs to radomes are similar to repairs to other honeycomb structures, but the technician needs to realize that repairs could affect the radar performance. A special tool is necessary to repair severely damaged radomes. [Figure 15] Transmissivity testing after radome repair ensures that the radar signal is transmitted properly through the radome. Radomes have lightning protections strips bonded to the outside of the radome to dissipate the energy of a lighting It is important that these lightning protection strips are in good condition to avoid damage to the radome structure. Typical failures of lightning protection strips that are found during inspection are high resistance caused by shorts in the strips or attaching hardware and disbonding of the strips from the radome surface. [Figures 16] |
| Figure 15. Radome repair tool |
 |
| Figure 16. Lightning protection strips on a radome |
External Bonded Patch Repairs
Repairs to damaged composite structures can be made with an external patch. The external patch repair could be made with prepreg, a wet layup, or a precured patch. External patches are usually stepped to reduce the stress concentration at the edge of the patch. The disadvantages of the external patch are the eccentricity of the loading that causes peel stresses and the protrusion of the patch in the air stream. The advantage of the external patch is that it is easier to accomplish than a flush scarf-type repair.
External Bonded Repair With Prepreg Plies
The repair methods for carbon, fiberglass, and Kevlar® are similar. Fiberglass is sometimes used to repair Kevlar® material. The main steps in repairing damage with an external patch are investigating and mapping the damage, removal of the damage, layup of the repair plies, vacuum bagging, curing, and finish coating.
Step 1: Investigating and Mapping the Damage
Use the tap test or ultrasonic test to map out the damage.
Step 2: Damage Removal
Trim out the damage to a smooth round or oval shape. Use scotch or sand paper to rough up the parent surface at least 1 inch larger than the patch size. Clean the surface with an approved solvent and cheese cloth.Step 3: Layup of the Repair Plies
Use the SRM to determine the number, size, and orientation of the repair plies. The repair ply material and orientation must be the same as the orientation of the parent structure. The repair can be stepped to reduce peel stresses at the edges.
Step 4: Vacuum Bagging
A film adhesive is placed over the damaged area and the repair layup is placed on top of the repair. The vacuum bagging materials are placed on top of the repair (see Prepreg Layup and Controlled Bleed Out) and a vacuum is applied.
Step 5: Curing the Repair
The prepreg patch can be cured with a heater blanket that is placed inside the vacuum bag, oven, or autoclave when the part can be removed from the aircraft. Most prepregs and film adhesives cure at either 250 °F or 350 °F. Consult the SRM for the correct cure cycle.
Step 6: Applying Top Coat
Remove the vacuum bag from the repair after the cure and inspect the repair, remove the patch if the repair is not satisfactory. Lightly sand the repair and apply a protective topcoating.
External Repair Using Wet Layup and Double Vacuum Debulk Method (DVD)
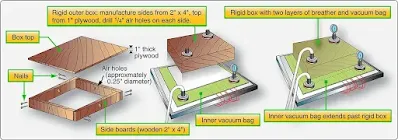
Generally, the properties of a wet layup repair are not as good as a repair with prepreg material; but by using a DVD method, the properties of the wet layup process can be improved. The DVD process is a technique to remove entrapped air that causes porosity in wet layup laminates. The DVD process is often used to make patches for solid laminate structures for complex contoured surfaces. The wet layup patch is prepared in a DVD tool and then secondary bonded to the aircraft structure. [Figure 17] The laminating process is similar to a standard wet layup process. The difference is how the patch is cured. |
| Figure 17. DVD tool made from wood two by fours and plywood |
Double Vacuum Debulk Principle
The double vacuum bag process is used to fabricate wet layup or prepreg repair laminates. Place the impregnated fabric within the debulking assembly, shown in Figure 17. To begin the debulking process, evacuate the air within the inner flexible vacuum bag. Then, seal the rigid outer box onto the inner vacuum bag, and evacuate the volume of air between the rigid outer box and inner vacuum bag. Since the outer box is rigid, the second evacuation prevents atmospheric pressure from pressing down on the inner vacuum bag over the patch. This subsequently prevents air bubbles from being pinched off within the laminate and facilitates air removal by the inner vacuum. Next, heat the laminate to a predetermined debulking temperature in order to reduce the resin viscosity and further improve the removal of air and volatiles from the laminate. Apply the heat through a heat blanket that is controlled with thermocouples placed directly on the heat blanket. Once the debulking cycle is complete, compact the laminate to consolidate the plies by venting the vacuum source attached to the outer rigid box, allowing atmospheric pressure to reenter the box and provide positive pressure against the inner vacuum bag. Upon completion of the compaction cycle, remove the laminate from the assembly and prepare for cure.
DVD tools can be purchased commercially but can also be fabricated locally from wood two-by-fours and sheets of plywood, as illustrated in Figure 17.
Patch Installation on the Aircraft
After the patch comes out of the DVD tool, it is still possible to form it to the contour of the aircraft, but the time is typically limited to 10 minutes. Place a film adhesive, or paste adhesive, on the aircraft skin and place the patch on the aircraft. Use a vacuum bag and heater blanket to cure the adhesive. [Figures 18 and 19] |
| Figure 18. Double vacuum debulk schematic |
 |
| Figure 19. DVD cure cycle |
External Repair Using Precured Laminate Patches
Precured patches are not very flexible and cannot be used on highly curved or compound curved surfaces. The repair steps are similar as in External Bonded Repair With Prepreg Plies, except step 3 and 4 that follow.
Step 3: A Precured Patch
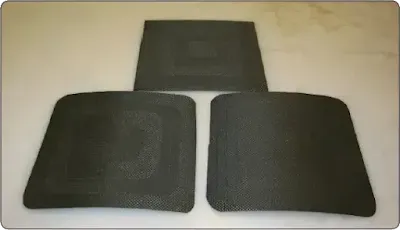
Consult the SRM for correct size, ply thickness, and orientation. You can laminate and cure the precured patch in the repair shop and secondary bond to the parent structure, or obtain standard precured patches. [Figure 20] |
| Figure 20. Precured patches |
Step 4: For a Precured Patch
Apply film adhesive or paste adhesive to the damaged area and place the precured patch on top. Vacuum bag the repair and cure at the correct temperature for the film adhesive or paste adhesive. Most film adhesive cure at either 250 °F or 350 °F. Some paste adhesives cure at room temperature although an elevated temperature could be used to speed the curing process.
Bonded versus Bolted Repairs
Bonded repair concepts have found applicability in both types of manufacturing assembly methods. They have the advantage of not introducing stress concentrations by drilling fastener holes for patch installation and can be stronger than original part material. The disadvantage of bonded repairs is that most repair materials require special storage, handling, and curing procedures.
Bolted repairs are quicker and easier to fabricate than bonded repairs. They are normally used on composite skins thicker than 0.125-inch to ensure sufficient fastener bearing area is available for load transfer. They are prohibited in honeycomb sandwich assemblies due to the potential for moisture intrusion from the fastener holes and the resulting core degradation. Bolted repairs are heavier than comparable bonded repairs, limiting their use on weight-sensitive flight control surfaces. Honeycomb sandwich parts often have thin face sheets and are most effectively repaired by using a bonded scarf type repair. A bonded external step patch can be used as an alternative. Bolted repairs are not effective for thin laminates because of the low bearing stress of the composite laminate. Thicker solid laminates used on larger aircraft can be up to an inch thick in highly loaded areas and these types of laminates cannot be effectively repaired using a bonded scarf type repair. [Figure 21] |
| Figure 21. Bolted versus bonded repair |
Bolted Repairs
Aircraft designed in the 1970s used composite sandwich honeycomb structure for lightly loaded secondary structure, but new large aircraft use thick solid laminates for primary structure instead of sandwich honeycomb. These thick solid laminate structures are quite different from the traditional sandwich honeycomb structures used for flight controls, landing gear doors, flaps, and spoilers of today’s aircraft. They present a challenge to repair and are difficult to repair with a bonded repair method. Bolted repair methods have been developed to repair thicker solid laminates.
Bolted repairs are not desirable for honeycomb sandwich structure due to the limited bearing strength of the thin face sheets and weakened honeycomb structure from drilling holes. The advantage of a bolted repair is that you need to select only patch material and fasteners, and the repair method is similar to a sheet metal repair. There is no need for curing the repair and storing the prepreg repair material and film adhesives in a freezer. Patches may be made from aluminum, titanium, steel, or precured composite material. Composite patches are often made from carbon fiber with an epoxy resin or fiberglass with an epoxy resin.
You can repair a carbon fiber structure with an aluminum patch, but you must place a layer of fiberglass cloth between the carbon part and the aluminum patch to prevent galvanic corrosion. Titanium and precured composite patches are preferred for repair of highly loaded components. Precured carbon/epoxy patches have the same strength and stiffness as the parent material as they are usually cured similarly.
Titanium or stainless steel fasteners are used for bolted repairs of a carbon fiber structure. Aluminum fasteners corrode if used with carbon fiber. Rivets cannot be used because the installation of rivets using a rivet gun introduce damage to the hole and surrounding structure and rivets expand during installation, which is undesirable for composite structures because it could cause delimination of the composite material.
Repair Procedures
Step 1: Inspection of the Damage
The tap test is not effective to detect delamination in thick laminates unless the damage is close to the surface. An ultrasonic inspection is necessary to determine the damage area. Consult the SRM to find an applicable NDI procedure.
Step 2: Removal of the Damage
The damaged area needs to be trimmed to a round or rectangular hole with large smooth radii to prevent stress concentrations. Remove the damage with a sander, router, or similar tool.
Step 3: Patch Preparation
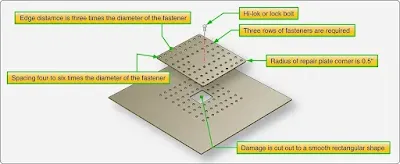
Determine the size of the patch based on repair information found in the SRM. Cut, form, and shape the patch before attaching the patch to the damaged structure. It is easier to make the patch a little bigger than calculated and trim to size after drilling all fastener holes. In some cases, the repair patches are stocked preshaped and predrilled. If cutting is to be performed, standard shop procedures should be used that are suitable for the patch material. Titanium is hard to work and requires a large powerful slip roller to curve the material. Metal patches require filing to prevent crack initiation around the cut edges. When drilling pilot holes in the composite, the holes for repair fasteners must be a minimum of four diameters from existing fasteners and have a minimum edge distance of three fastener diameters. This is different from the standard practice for aluminum of allowing a two diameter distance. Specific pilot hole sizes and drill types to be used should follow specific SRM instructions. [Figure 22] |
| Figure 22. Repair layout for bolted repair of composite structure |
Step 4: Hole Pattern Lay Out
To locate the patch on the damaged area, draw two perpendicular centerlines on the parent structure and on the patch material that define the principal load or geometric directions. Then, lay out hole pattern on the patch and drill pilot holes in the patch material. Align the two perpendicular centerlines of the patch with the lines on the parent structure and transfer the pilot holes to the parent material. Use clecos to keep the patch in place. Mark the edges of the patch so that it can be returned to the same location easily.
Step 5: Drilling and Reaming Holes in Patch and Parent Structure
Composite skins should be backed up to prevent splitting. Enlarge the pilot holes in the patch and parent materials with a drill 1⁄64 undersize and then ream all holes to the correct size. A tolerance of +0.0025/–0.000-inch is usually recommended for aircraft parts. For composites, this means interference fasteners are not used.Step 6: Fastener Installation
Once fastener holes are drilled full size and reamed, permanent fasteners are installed. Before installation, measure the fastener grip length for each fastener using a grip length gauge. As different fasteners are required for different repairs, consult the SRM for permissible fastener type and installation procedure. However, install all fasteners wet with sealant and with proper torque for screws and bolts.
Step 7: Sealing of Fasteners and Patch
Sealants are applied to bolted repairs for prevention of water/ moisture intrusion, chemical damage, galvanic corrosion, and fuel leaks. They also provide contour smoothness. The sealant must be applied to a clean surface. Masking tape is usually placed around the periphery of the patch, parallel with the patch edges and leaving a small gap between the edge of the patch and the masking tape. Sealing compound is applied into this gap.
Step 8: Application of Finish Coat and Lightning Protection
Mesh The repair needs to be sanded, primed, and painted with an approved paint system. A lightning protection mesh needs to be applied if composite patches are used in an area that is prone to lightning strikes.
RELATED POSTS


