The brake set up for box and pan brakes and cornice brakes is identical. [Figure 1] A proper set up of the sheet metal brake is necessary because accurate bending of sheet metal depends on the thickness and temper of the material to be formed and the required radius of the part. Any time a different thickness of sheet metal needs to be formed or when a different radius is required to form the part, the operator needs to adjust the sheet metal brake before the brake is used to form the part. For this example, an L-channel made from 2024 –T3 aluminum alloy that is 0.032-inch thick will be bent.
 |
| Figure 1. Brake radius nosepiece adjustment |
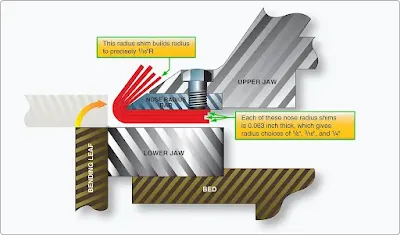
Step 1: Adjustment of Bend Radius
The bend radius necessary to bend a part can be found in the part drawings, but if it is not mentioned in the drawing, consult the SRM for a minimum bend radius chart. This chart lists the smallest radius allowable for each thickness and temper of metal that is normally used. To bend tighter than this radius would jeopardize the integrity of the part. Stresses left in the area of the bend may cause it to fail while in service, even if it does not crack while bending it.The brake radius bars of a sheet metal brake can be replaced with another brake radius bar with a different diameter. [Figure 2] For example, a 0.032-inch 2024-T3 L channel needs to be bent with a radius of 1⁄8-inch and a radius bar with a 1⁄8-inch radius must be installed. If different brake radius bars are not available, and the installed brake radius bar is smaller than required for the part, it is necessary to bend some nose radius shims. [Figure 3]
 |
| Figure 2. Interchangeable brake radius bars |
 |
| Figure 3. Nose radius shims may be used when the brake radius bar is smaller than required |
If the radius is so small that it tends to crack annealed aluminum, mild steel is a good choice of material. Experimentation with a small piece of scrap material is necessary to manufacture a thickness that increases the radius to precisely 1⁄16-inch or 1⁄8-inch. Use radius and fillet gauges to check this dimension. From this point on, each additional shim is added to the radius before it. [Figure 4]
 |
| Figure 4. General brake overview including radius shims |
Example: If the original nose was 1⁄16-inch and a piece of .063-inch material (1⁄16-inch) was bent around it, the new outside radius is 1⁄8-inch. If another .063-inch layer (1⁄16-inch) is added, it is now a 3⁄16-inch radius. If a piece of .032-inch (1⁄32-inch) instead of .063-inch material (1⁄16-inch) is bent around the 1⁄8-inch radius, a 5⁄32-inch radius results.
Step 2: Adjusting Clamping Pressure
The next step is setting clamping pressure. Slide a piece of the material with the same thickness as the part to be bent under the brake radius piece. Pull the clamping lever toward the operator to test the pressure. This is an over center type clamp and, when properly set, will not feel springy or spongy when pulled to its fully clamped position. The operator must be able to pull this lever over center with a firm pull and have it bump its limiting stops. On some brakes, this adjustment has to be made on both sides of the brake.
Place test strips on the table 3-inch from each end and one in the center between the bed and the clamp, adjust clamp pressure until it is tight enough to prevent the work pieces from slipping while bending. The clamping pressure can be adjusted with the clamping pressure nut. [Figure 5]
 |
| Figure 5. Adjust clamping pressure with the clamping pressure nut |
Step 3: Adjusting the Nose Gap
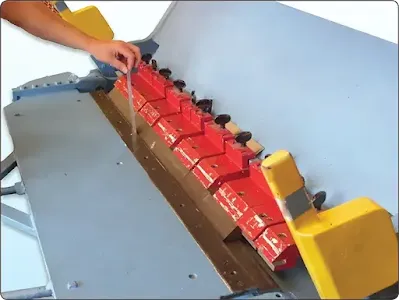
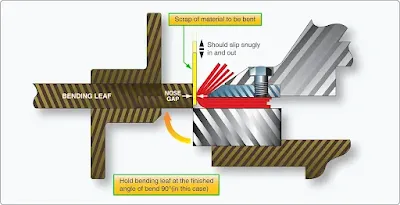
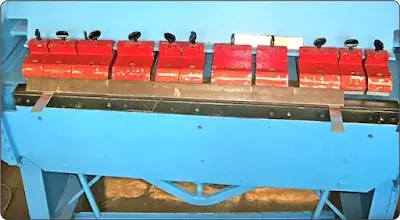
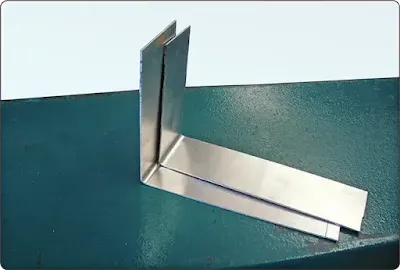
Adjust the nose gap by turning the large brake nose gap adjustment knobs at the rear of the upper jaw to achieve its proper alignment. [Figure 5] The perfect setting is obtained when the bending leaf is held up to the angle of the finished bend and there is one material thickness between the bending leaf and the nose radius piece. Using a piece of material the thickness of the part to be bent as a feeler gauge can help achieve a high degree of accuracy. [Figures 6 and 7] It is essential this nose gap be perfect, even across the length of the part to be bent. Check by clamping two test strips between the bed and the clamp 3-inch from each end of the brake. [Figure 8] Bend 90° [Figure 9], remove test strips, and place one on top of the other; they should match. [Figure 10] If they do not match, adjust the end with the sharper bend back slightly.
 |
| Figure 6. Brake nose gap adjustment with piece of material same thickness as part to be formed |
 |
| Figure 7. Profile illustration of brake nose gap adjustment |
 |
| Figure 8. Brake alignment with two test strips 3-inches from each end |
 |
| Figure 9. Brake alignment with two test strips bent at 90° |
 |
| Figure 10. Brake alignment by comparing test strips |
RELATED POSTS


