
Aircraft technicians do not necessarily need to be accomplished at making drawings. However, they must have a working knowledge of the information conveyed by them. Technicians most frequently encounter drawings during the construction and assembly of new aircraft and components, when carrying out modifications, and when making repairs.
A drawing cannot be read all at once, any more than an entire page of printed text can be read at a glance. Both must be read one line at a time. To read a drawing effectively, follow a systematic procedure.
When opening a drawing, first read the drawing number and the description of the article. Next, check the model affected, the latest change letter, and the next assembly listed. After determining that the drawing is the correct one, proceed to study the illustration(s).
When reading a multiview drawing, first obtain a general idea of the object’s shape by scanning all the views. Then select one view for closer study. By referring back and forth to adjacent views, it is possible to determine what each line represents.
Each line in a view represents a change in the direction of a surface, but another view must be consulted to determine the nature of that change. For example, a circle in one view may represent either a hole or a protruding boss, as shown in the top view of the object in Figure 1.
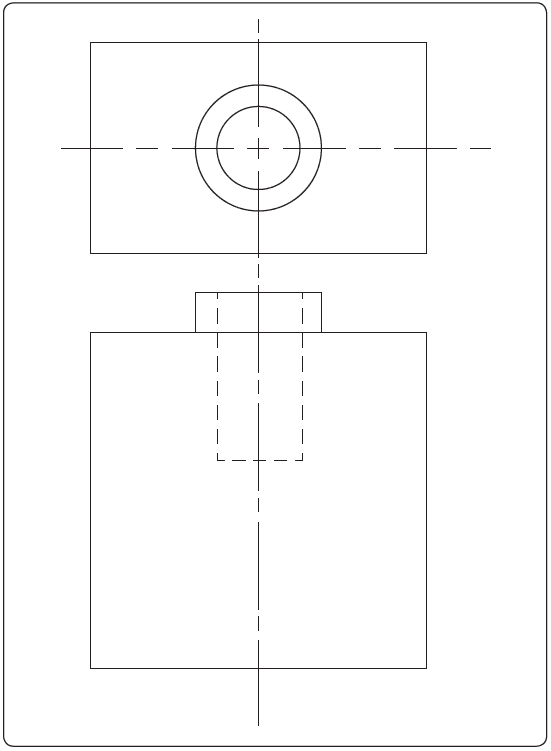
In the top view, two circles can be seen. However, the other view must be consulted to determine what each circle represents. A glance at the other view shows that the smaller circle represents a hole, while the larger circle represents a protruding boss. In the same way, the top view must be consulted to determine the shapes of the hole and the protruding boss.
This example shows that a drawing cannot be interpreted by looking at a single view when more than one view is provided. Two views do not always fully describe an object. When three views are given, all three must be consulted to ensure that the object’s shape is interpreted correctly.
After determining the shape of an object, determine its size. Dimensions and tolerances are provided to ensure that specified design requirements are met. Dimensions are indicated by figures, either with or without the inch mark. If no inch mark is used, the dimension is expressed in inches.
It is customary to provide dimensions for individual parts as well as an overall dimension indicating the greatest length of the part. If the overall dimension is missing, it can be determined by adding the separate part dimensions. Many drawings for new aircraft and components now use the metric system, with millimeters (mm) as the unit of measurement.
Drawings may be dimensioned in decimals or fractions. This is especially true of tolerances. Instead of using plus and minus signs to indicate tolerances, some drawings provide the complete dimensions for both limits. For example, if a dimension is 2 inches with a plus-or-minus tolerance of 0.01 inch, the drawing would show the limit dimensions as follows:
2.01
1.99
A print tolerance, usually found in the title block, is a general tolerance that can be applied to parts where dimensions are noncritical. When a tolerance is not shown on a dimension line, the print tolerance applies.
To complete the interpretation of a drawing, read the general notes and the contents of the material block. Identify the various changes incorporated into the drawing, and read any special information provided in or near the views and sections.