Aircraft drawings use standardized lines and symbols to communicate the shape, dimensions, construction details, and features of aircraft components. Each line type has a specific meaning, while drawing symbols represent materials, shapes, and electrical devices. Understanding these conventions is essential for reading and interpreting aircraft drawings accurately, particularly during aircraft maintenance and inspection.
Table of Contents
Table of Contents
Lines and Their Meanings
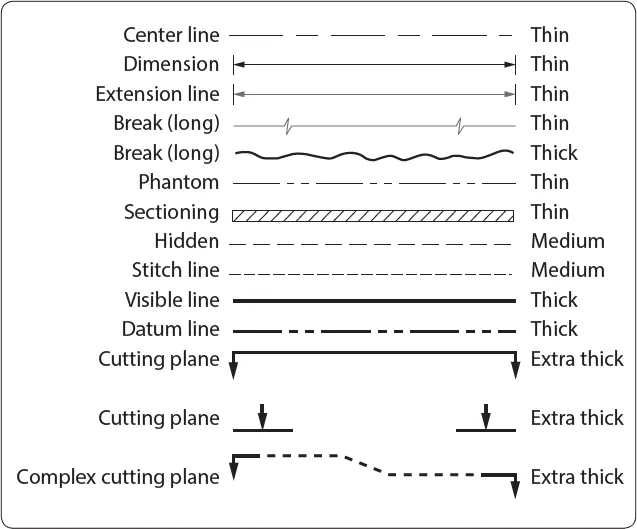
Every drawing is composed of lines. Lines mark the boundaries, edges, and intersections of surfaces. They are used to show dimensions, hidden surfaces, and centers. If the same type of line were used to represent all these features, a drawing would become a meaningless collection of lines. For this reason, standardized line types are used on aircraft drawings. [Figure 1]
Examples of correct line uses are shown in Figure 2.
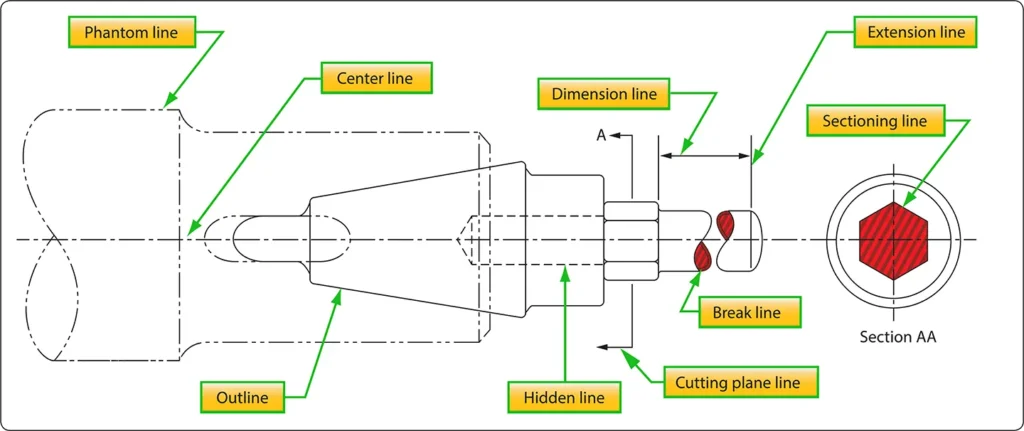
Most drawings use three widths, or intensities, of lines: thin, medium, or thick. These lines may vary somewhat on different drawings, but there is a noticeable difference between a thin and a thick line, with the width of the medium line somewhere between the two.
Centerlines
Centerlines consist of alternating long and short dashes. They indicate the center of an object or a portion of an object. Where centerlines cross, the short dashes intersect symmetrically. For very small circles, centerlines may be shown as unbroken lines.
Dimension Lines
A dimension line is a thin, solid line that is interrupted at the midpoint to accommodate measurement information. It has arrowheads pointing in opposite directions at each end to indicate the beginning and end of a measurement. Dimension lines are generally parallel to the feature being measured. They are placed outside the outline of the object and, when multiple views are shown, between the views where appropriate.
All dimensions and lettering are arranged so that they read from left to right. An angle is dimensioned by placing its degree measurement along the arc. Circular features are dimensioned by diameter, usually marked with the letter D or the abbreviation DIA following the value. An arc is dimensioned by its radius, marked with the letter R following the value.
Parallel dimensions are arranged so that the longest dimension is farthest from the object’s outline, while the shortest is closest to it. On drawings containing several views, dimensions are placed on the views that best show the relevant details.
When dimensioning distances between holes, measurements are usually taken from center to center rather than from the outside edges of the holes. When several holes of different sizes are shown, their required diameters are indicated with a leader, followed by notes specifying the machining operations for each hole. If a part requires three equal-sized holes spaced equally apart, this requirement is stated explicitly.
For precision work, dimensions are given in decimal form. Counterbored holes are specified by their diameters and depths. For countersunk holes, the countersinking angle and diameters are specified. [Figure 3]

Dimensions specifying tolerances indicate the allowable variation in size and the clearance permitted between mating or moving parts.. A positive allowance is specified for a part intended to slide or revolve on another part. A negative allowance is specified for a force fit. Whenever possible, tolerances and allowances for desired fits conform to the American Standard for Tolerances, Allowances, and Gauges for Metal Fits. The classes of fit specified by the standard may be indicated on assembly drawings.
Extension Lines
Extension lines extend from the side or edge of a figure to provide a reference for placing a dimension. They are thin lines, with a short gap where they begin at the object, and extend a short distance beyond the arrowhead of the dimension line.
Sectioning Lines
Sectioning lines indicate the exposed surfaces of an object in a sectional view. They are generally thin, continuous lines, but their appearance may vary according to the material being represented.
Phantom Lines
Phantom lines indicate alternate positions of parts or the relative position of a missing part. They consist of one long dash followed by two short, evenly spaced dashes.
Break Lines
Break lines indicate that a portion of an object has been omitted from the drawing. Short breaks are represented by solid, freehand lines. Long breaks are shown using solid, ruled lines with zigzags.
For shafts, rods, tubes, and similar parts in which a portion of the length is omitted, the ends of the break are drawn as shown in Figure 2.
Leader Lines
Leader lines are solid lines with a single arrowhead. They identify the part or portion of an object to which a note, number, or other reference applies.
Hidden Lines
Hidden lines indicate invisible edges or contours. They consist of short, evenly spaced dashes and are often referred to as dashed lines.
Outline or Visible Lines
Outline or visible lines represent the edges and surfaces of an object that can be seen when it is viewed directly. They are thick lines used to show the visible features of the object.
Stitch Lines
Stitch lines indicate stitching or sewing lines on an article. They consist of a series of very short, evenly spaced dashes, approximately half the length of hidden-line dashes.
Long lines of stitching may be represented by a series of stitch lines connected by phantom lines.
Cutting Plane and Viewing Plane Lines
Cutting plane lines indicate the plane at which a sectional view of an object is taken. In Figure 2, plane line A indicates the plane from which section AA is taken.
Viewing plane lines indicate the plane from which a surface is viewed.
Drawing Symbols
Aircraft component drawings are composed largely of symbols and conventions that represent shape and material. Symbols serve as a shorthand for drawing, graphically representing a component’s characteristics with a minimum amount of detail.
Material Symbols
Section-line symbols indicate the type of material from which a part is constructed. A material may not be represented symbolically if its exact specification is provided elsewhere on the drawing.
In such cases, the simpler symbol for cast iron may be used for sectioning, while the material specification is listed in the bill of materials or included in a note. Figure 4 illustrates several standard material symbols.

Shape Symbols
Symbols can be used to show the shape of an object. Typical shape symbols used on aircraft drawings are shown in Figure 5. These symbols are usually represented on a drawing as a revolved or removed section.

Electrical Symbols
Electrical symbols represent electrical devices rather than showing the actual physical appearance of the units. [Figure 6]
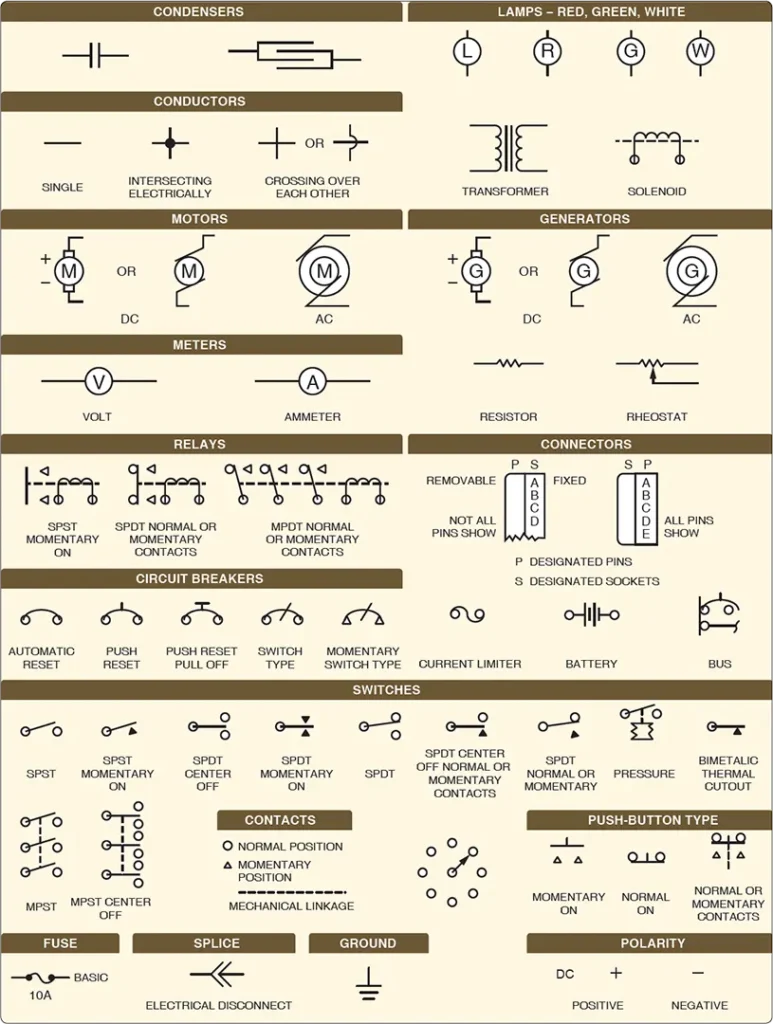
Once the meanings of the symbols are understood, an electrical diagram can be read to determine what each unit represents, what function it performs, and how it is connected within the system.